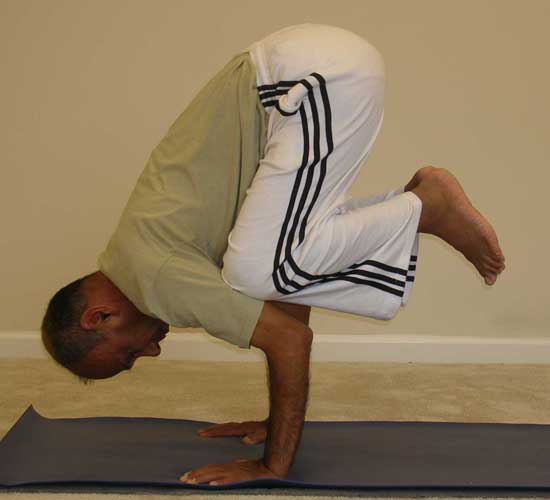
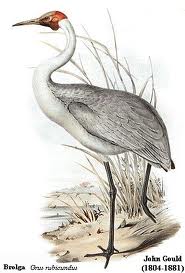
The word "baka" means a crane in Sanskrit – hence the name "Crane Pose". In some texts, you may find the word ‘bakasana’ ( बकासन) wrongly translated as "Crow Pose". The word for crow in Sanskrit is "kaka" so the Sanskrit word for "crow pose" would be "Kakasana".
You would have seen a crane, with long legs, standing in shallow waters of a river, as if in meditation. In fact, the crane seems very calm but is very alert and is constantly on the lookout for a fish that it can catch. That is why in some yoga texts, this pose is also called "baka dhyanasana" or "meditating crane pose". The final position of the pose looks pretty much like a crane, the two arms being the legs of the crane, the two feet representing the bird’s tail and the upper part looking like the crane in meditation, gazing constantly at water.
Bakasana could be a challenging pose for some beginner yoga students as it does require arm and wrist strength, core strength, coordination and balance.
Step-by-step
- Squat on the floor with the feet about two feet apart.
- Lift the heels and come up on your tiptoes.
- Place the palms flat on the floor, directly in line with the feet with the fingers pointing forward (or turned slightly inward).
- Keep the elbows slightly bent, pointing outward
- Adjust the position of the body such that the knees are against the outside of the upper arms, knees and upper arms pressing firmly against each other.
- Begin to shift the body weight slowly forward; this is where you will need to be aware of the imaginary "tipping line" crossing which might mean your falling face down.
- If you can maintain focus and balance, while moving the body forward, your feet may begin to lift off the ground slowly. Initially you may be able to lift the feet only for a few seconds. With practice over a period of time, you will begin to feel more comfortable in the final position and hold it for longer periods.
- In the final pose, try to maintain the firm contact between the knees and the upper arms. Once you become comfortable in the final pose, you may attempt to bring the feet together and lift the heels up toward the buttocks.
- Keep the head lifted up as much as possible, with your gaze fixed at some point in front of you.
- Maintain your regular, natural breathing pattern while in the pose.
- Come out of the pose by slowly bringing the feet down to the floor, back to the original squat position.
Note for Beginners
If you are just beginning to learn the pose you are likely to run into two problems. First, due to lack of strength in the wrists and arms, as well as lack of coordination, you may not be able to keep the knees and the upper arms together. The moment you shift the body forward and try to separate the feet from the ground, your arms may slip off the knees. Second, you may not be aware of the imaginary tipping line and may tip over landing on nose or forehead. These two problems can actually build a sense of fear and uncertainty in your mind. The easiest way to overcome the fear and avoid injury is to start by placing a pair of cushions (or even a block) in front of you. If you happen to tip over or lose your balance your head will fall on the cushion. Another option is to start the pose by resting your forehead on the cushion and then working your way to lift the feet off the ground. Once you feel stable enough, you may attempt to lift the head off the cushion.
Benefits
- Strengthens shoulders, arms and wrists
- Stretches the upper back
- Strengthens the core muscles and tones the abdominal organs
- Opens the thighs and the groins
- Develops a sense of balance, coordination and concentration
- Develops self-trust and eliminates fear
Contraindications and Cautions
- Carpal tunnel syndrome
- Arm or shoulder injury
- Pregnancy
Share you experience
If you have been practicing the Bakasana, or have attempted it a few times, successfully or otherwise, I’d love to hear your experience. Please provide your comments below.


what are some good counter poses to follow up with after bakasana?
Hi Dawn, after bakasana, downward facing dog would be a good pose to stretch the arms and legs. You can also do the seated forward bend – pashchimottanasana.
Thanks, Jeff, for your excellent feedback. I now understand what Issac had in mind about shifting the position of hands every so frequently. I think keeping something like a squeeze ball handy which you can squeeze every thirty minutes or so may help relieve any built up stress from the hands/wrists.
I can say this. I work at home and I am not a person who can sit or be in the same position for long periods of time. Therefore, I get up often and probably never sit and type or use a mouse for more than a 30 minute period without my hands being in some other position for 5 or more minutes. I do not and have never had carpal tunnel syndrome. Those that I know that do are people who sat for hours at a computer using the mouse and keyboard all that time.
I think what Isaac was alluding to is avoiding the same position or repeated action, day in and day out, that involves the wrists/hands.
you can always prevent carpal tunnel syndrome by changing the position of your hands every 30 minutes or so. A simple solution to a very bad problem. `,'”:
Many thanks http://www.healthmedicinelab.com“>
Dear Issac, could you elaborate a little more on your comment about changing the position of the hands every thirty minutes? thanks.