Many of my students look for instructions on some of the basic yoga techniques that we practice in the class so they can practice these at home. In order to fulfill this need, I will be presenting here, as and when I find the time, some specific aspects of yoga – asana, pranayama, meditation, diet or yoga philosophy. In this issue, we will look at one of the commonly practiced forward bending poses called “janu-shirshasana” (head-to-knee pose). However, before we get into the specifics, I would like to emphasize a few general guidelines related to yoga practice:
- In order to derive full benefits of yoga, one needs to establish a regular daily routine of personal yoga practice. The need for a regular practice – abhyasa- has been underlined in our scriptures such as Yoga Sutra of Patanjali (sutras 1.13, 1.14) and Bhagavad Gita (shloke 6.35). The best time for yoga practice is early morning, after you are done with your daily cleansing routine. However, depending upon your daily schedule, you may dedicate any time of the day for yoga as long as there is a gap of at least 2.5 hours between yoga and your last meal. Practicing yoga for as little as 20 minutes a day is far more beneficial than spending an hour or longer once a week.
- As mentioned in an earlier column, yoga provides several benefits at various levels – physical, mental, intellectual and spiritual. However, it is very important that we keep the practice safe and injury-free. One of the key guidelines to follow is that you must never try to stretch yourself beyond the limits of your body’s flexibility, strength and endurance. Patanjali, in his Yoga Sutras, defines “asana” (physical posture) as “sthira sukhamasanam” – a posture needs to be steady/firm and comfortable. This implies that in every yoga pose, you should be able to stay steady and without any pain or discomfort. Another key concept in yoga is that of “ahimsa” or “non-injury” which, from an asana point of view, implies that we should not injure ourselves while practicing yoga. We must remind ourselves that yoga is non-competitive and its purpose is to heal, not hurt.
For a list of the commonly practiced asanas, along with their Sanskrit names and pronunciation, please visit the website http://www.integralyogastudio.com/asana_chart.php.
Step-by-Step
Audio instructions:
- Sit on the yoga mat with your legs stretched out in front. Keep the spine upright and as close to being vertical as comfortable.
- Bend the left knee and put the sole of the left foot against the inside of the right thigh, bringing the heel as close to the perineum as comfortable. Try to keep the left knee close to the floor and the right leg fully stretched out.
- Stretch the arms out in front and while inhaling raise the arms up to a vertical position.
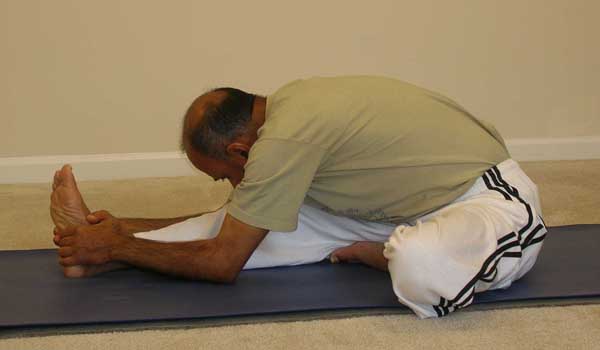
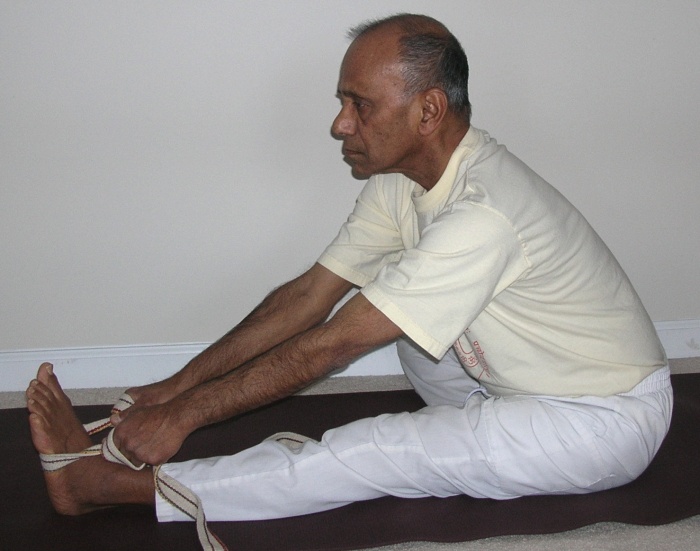
- While exhaling, begin to bend forward, bending from the hips, aligning the chest with the right thigh and keeping the spine unrounded. Try to grab the toes, ankles or calves depending upon your level of flexibility. If your hands do not reach the toes comfortably, you may like to use a strap looped around the foot.
- Once you are in the final pose, use your breath as a guide to deepen the experience of the stretch – while inhaling, elongate the spine and while exhaling allow the gravity to pull the chest down closer to the thigh. Hold the position for 5 to 7 breaths, if possible. Maintain full awareness on the stretch and the breath, paying close attention to the parts of the body where the stretch is felt most. This awareness will help you maintain the pose at a comfortable level and prevent any injury.
- To come out of the pose, begin to raise the arms up while inhaling. When the arms reach a vertical position, release the arms down.
- We’ll now repeat the above steps with the other leg stretched out.
- Bend the right knee and put the sole of the right foot against the inside of the left thigh, bringing the heel as close to the perineum as comfortable. Try to keep the right knee close to the floor and the left leg fully stretched out.
- Stretch the arms out in front and while inhaling raise the arms up to a vertical position.
- While exhaling, begin to bend forward, bending from the hips, aligning the chest with the left thigh and keeping the spine unrounded. Try to grab the toes, ankles or calves depending upon your level of flexibility. If your hands do not reach the toes comfortably, you may like to use a strap looped around the foot.
- Once you are in the final pose, use your breath as a guide to deepen the experience of the stretch – while inhaling, elongate the spine and while exhaling allow the gravity to pull the chest down closer to the thigh. Hold the position for 5 to 7 breaths, if possible. Maintain full awareness on the stretch and the breath, paying close attention to the parts of the body where the stretch is felt most. This awareness will help you maintain the pose at a comfortable level and prevent any injury.
- To come out of the pose, begin to raise the arms up while inhaling. When the arms reach a vertical position, release the arms down.
- Take a few natural, comfortable breaths and relax.
Variation
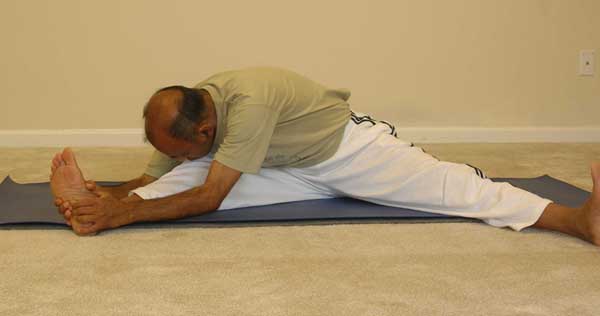
- Sit on the floor (on the yoga mat or a clean blanket) with your legs spread out wide apart. Keep the spine upright and as close to being vertical as comfortable.
- Stretch the arms out in front and while inhaling raise the arms up to a vertical position.
- While exhaling, turn the torso to the right and begin to bend forward, bending from the hips, aligning the chest with the right thigh and keeping the spine unrounded. Try to grab the toes, ankles or calves depending upon your level of flexibility. If your hands do not reach the toes comfortably, you may like to use a strap looped around the foot.
- Once you are in the final pose, use your breath as a guide to deepen the experience of the stretch – while inhaling, elongate the spine and while exhaling allow the gravity to pull the chest down closer to the thigh. Hold the position for 5 to 7 breaths, if possible. Maintain full awareness on the stretch and the breath, paying close attention to the parts of the body where the stretch is felt most. This awareness will help you maintain the pose at a comfortable level and prevent any injury.
- To come out of the pose, begin to raise the arms up while inhaling. When the arms reach a vertical position, turn the torso back to the center and release the arms down.
- Repeat the above steps on the other side.
Contraindications
Avoid this pose in case of diarrhea, asthma and a recent knee, neck or back injury. In case of knee pain, avoid bringing the heel close to the perineum and/or keep a folded blanket under the bent knee for support.
Benefits
The janu shirshasana stretches the back and deeply stretches the back of the legs. This posture calms the mind and emotions, stimulates the nervous, reproductive, endocrine and urinary systems.


[…] For instructions and other details … […]