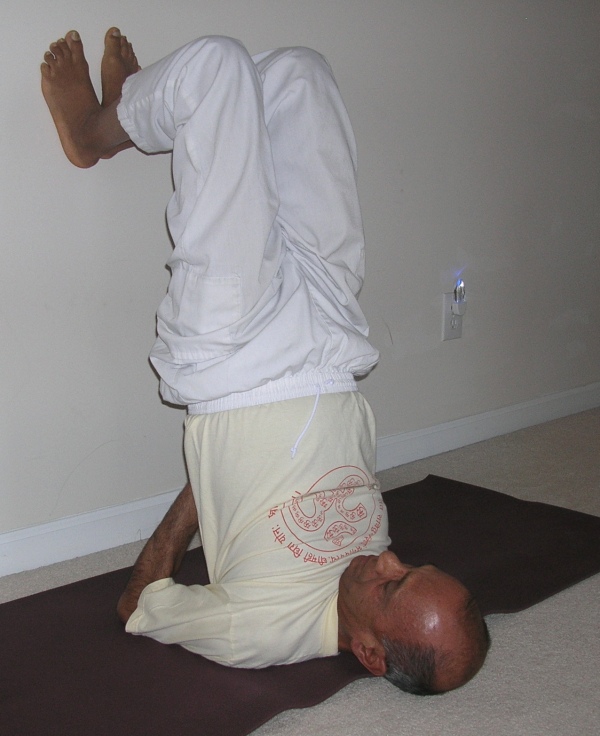
Sarvangasana with wall support
In a previous article, I discussed the Sarvangasana – सर्वाङ्गासन –
In this article, I will first discuss some possible variations to get into the pose while still not using the wall for support. If that doesn’t feel comfortable, then I’ll take you through the steps required for using the wall for support.
I hope you will enjoy practicing with the video sequence given below.
Step-by-step
In the previous article, I discussed the technique of getting into Sarvangasana without the wall support. In the standard technique we begin by keeping the legs straight on the floor. When we begin to get into the pose, we still try to keep the legs very straight both while getting into the pose as well as while getting out of the pose.
Variations without wall support
- Relax on your mat in the Shavasana (corpse pose) for a few moments.
- Begin to lift the legs off the floor slowly while keeping the legs straight. When the legs reach the vertical position, pause briefly and then try to lift the buttocks off the floor in an effort to get into the full Sarvangasana. If you are unable to lift the buttocks off the floor with the legs straight, you can try a couple of simple variations to lift the body up into the pose.
- Bend the knees to your chest and then creating a little momentum, try to lift the buttocks up and get into the shoulder stand. If that doesn’t seem comfortable, come down and relax for a few moments again.
- The next variation that you can try is similar to the first one – bend the knees to the chest; this time, do a few rocking moves up and down while lifting the head up. While doing the rocking moves, make sure that you don’t over-strain your neck or shoulder muscles. Having created this additional momentum, then try to lift the buttocks up and try to get into the pose.
- If you are able to get up into the full pose in this manner, then follow the guidelines provided in the previous article to continue with the pose.
- If you are unable to get into the pose, gently get back to the mat and relax for a few more moments.
Wall support
Now take your mat close to a wall as you will use the wall to provide support to get into the pose.
- Sitting sideways, try to align your buttocks against the wall. Placing the elbow on the floor, use the elbow to pivot the body around so you end up being perpendicular to the wall, with the buttocks still almost touching the wall and the head resting on the floor.
- Bending the knees close to 90 degrees and place the feet flat against the wall. While trying to push the wall away with the feet, start lifting the buttocks up slowly. While doing so, make sure that you are not putting undue strain on your neck or shoulders.
- If you are feeling comfortable, continue to make the effort to lift buttocks up while pressing a little more with the feet against the wall. Again, without straining any part of the body, try to bring the buttocks almost vertically above the shoulders. At this point place the palms behind your back for additional support. This becomes your final position for Sarvangasana.
- You can stay in this pose for a couple of minutes or as long as you feel comfortable. To come out of the pose, release the buttocks down to the floor, roll the body to the side and relax on your mat in Shavasana.
- After using the above technique for a few days (or weeks), your neck and shoulders and the core area may develop enough strength to try the next move which is to try lifting the feet away from the wall.
- First, while in the final pose against the wall, try to lift one foot off the wall and stretch that leg up straight and vertical. Make sure that the buttocks don’t drop down while lifting the foot off the wall.
- If that feels comfortable, you can switch sides and try lifting the other foot away from the wall, again making sure that the buttocks don’t drop down.
- After practicing lifting one foot away at a time for a few days or weeks, you may then feel that you are ready to try lifting both the feet together off the wall and then try to lift the legs up to the vertical position in the final Sarvangasana position. Feel free to put the feet back on the wall if at any time you start feeling any kind of pain or discomfort in the neck or shoulders.
After practicing with wall support for some time, if you feel you are ready, you can graduate to practicing the pose without the support of the wall.
Once you are comfortable with the pose, you can follow the guidelines in the previous article to start working on the variations discussed therein.
Please see the previous article for benefits and contraindications for the pose.
I would love to get your feedback or comments. Please share your own experience with the practice of shoulder stand.
Recent Comments