Yoga offers a multitude of benefits at all levels – physical, physiological, mental, emotional, spiritual and deeper. Most of these benefits can be combined under these four broad categories:
- Strength
- Flexibility
- Endurance
- Balance
In this article, I will be presenting a set of asanas and asana sequences that will help develop strength in the upper body. Everything above the waist – writs, arms, shoulders, neck, the back and the core area – constitute the upper body that we’ll be working on. Of course, we must recognize that all these four attributes go hand-in-hand. The same asana or asana sequence can help develop all four – strength, flexibility, endurance and balance.
In this video, I am presenting a 35-minute sequence to develop upper body strength. I hope you’ll enjoy practicing this sequence.
Marjarasana (cat and cow stretch)

- Come on to all fours on your mat with your hands positioned vertically under the shoulders and the knees vertically under the hips. Spread the fingers wide and try to keep the palms flat and firm on the ground.
- In the starting position, the spine is flat like a tabletop. While inhaling, lift the head up, tail bone up, and lower the navel down toward the floor. This will create an arch in the spine. Think of it as a little valley in the spine.
- While exhaling, lower the chin down to the chest, tuck the tail bone in, and lift the navel up. This will create a rounding of the spine. Think of it as creating a small hill on the spine.
- Using the “ujjayi” pattern of breath, keep the breathing long and smooth and keep the movements synchronized with the breath. At the end of each inhalation and exhalation, give a small pause so you can become aware of the transition of the breath as well as of the spinal movement.
- Continue these movements for 4-5 breaths. Finally bring the spine back to the neutral, tabletop position and pause there for a couple of breaths. Then sit comfortable in a cross-legged position and relax.

Vasishthasana
Variation 1

- Start out in the Downward Facing Dog (Adhomukha-shvanasana) or Dandasana (Plank Pose).
- Shift the left hand to the center of the mat and turn the body sideways. In this position, the outside edge of the left foot is against the floor and the right foot is resting on the left.
- For better stability, position the left hand slightly in front of the shoulder level, not vertically under the shoulder. Stretch the left arm straight. In this position, the body is in a single vertical plane.
- If you feel comfortable, raise the right arm all the way up and position it in a straight line with the left. If the neck doesn’t bother you, you may want turn the neck to look up at the right hand. Otherwise, keep the head in the neutral position.
- Try to stay in the final position for about 8 to 10 breaths, if comfortable.
- When you come out of the pose, go back to the downward facing dog position for a few breaths.
- Repeat the same steps on the other side.
- Finally rest in the Child Pose (Balasana).
Variation 2

- Get into the position as described in the variation 1 above.
- If you can, raise the right leg up and try to bring it to a horizontal position.
- If keeping the bottom leg straight seems too challenging, bring the left knee down to the floor and then try to raise the leg up to a horizontal position.
- Try to stay in the final position for about 8 to 10 breaths, if comfortable.
- When you come out of the pose, go back to the downward facing dog position for a few breaths.
- Repeat the above steps on the other side.
- Finally rest in the Child Pose (Balasana).
Surya Namaskar with upper body routine
Next, we’ll practice three rounds of the Sun Salutation routine. In the second and third rounds, we’ll integrate variations that will help strengthen the upper body.
Round 1

- Stand close to the top of the mat with your feet together or slightly apart but parallel to each other. As you exhale, bring the palms together in the prayer position in front of your chest.
- Inhaling, stretch your arms out in front, raise them up and arch back from the waist, pushing the hips out, legs straight. Relax your neck.
- Exhaling, fold forward, keeping the arms alongside the ears initially. In the final position, drop your hands to get close to the toes. Try to keep the knees straight, bending slightly if necessary.
- Inhaling, bring the left leg back into the lunge position, sliding the foot as far back as comfortable and place the knee on the floor. Arch back and look up, lifting your chest and chin.
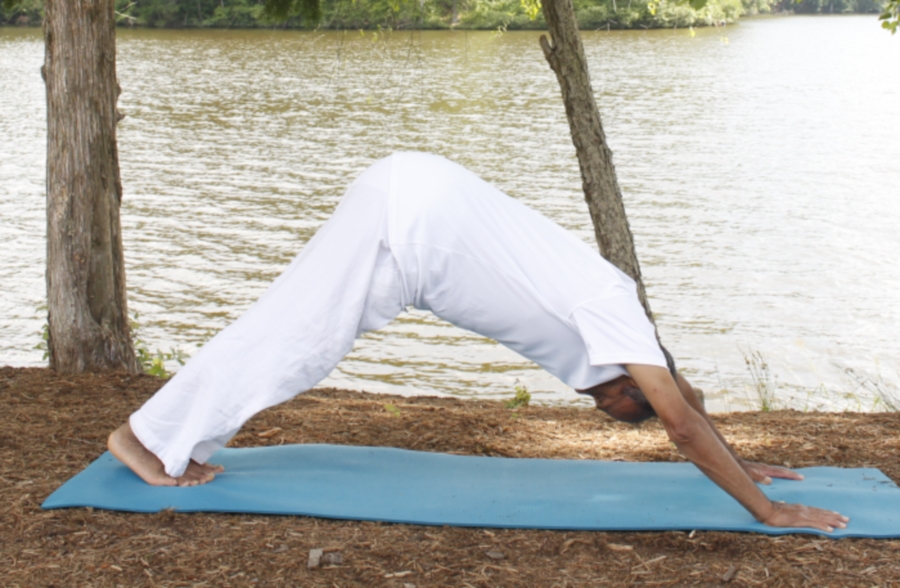
- Exhaling, bring the other leg back. Lift your buttocks up, pressing the heels down toward the floor. This asana is called the Adhomukha Shvanasana or Downward Facing Dog.
- Exhaling, lower the knees, chest and the chin to the floor, keeping your buttocks lifted up. This is called the “ashtanga mudra” (the gesture with eight limbs on the floor).
- Inhaling, lower the abdomen to the floor and slowly begin to lift your head, neck and chest to get into the Bhujangasana (Cobra pose). Lift the palms off the floor and using the upper body strength, try to lift the chest higher. Also, lift the legs off the floor, keeping them straight.
- Exhaling, place the palms down, curl your toes under, lift the buttocks up to get back to the downward facing dog. Try to push your heels and forehead down and keep your shoulders back.
- Inhaling, lift the head up, bring the left foot forward and place it between your hands. Rest the other knee on the floor and look up.
- Exhaling, bring the other leg forward and bend down from the waist with the knees stretched straight. This is called Uttanasana (standing forward bending pose).
- Inhaling, stretch your arms in front against the ears, lift them up and back overhead and bend back slowly from the waist.
- Exhaling, gently come back to an upright position and bring your arms down by your sides. Relax for a few breaths before proceeding with the next round.
Round 2
- Stand close to the top of the mat with your feet together or slightly apart but parallel to each other. As you exhale, put your hands in the prayer position in front of your chest.
- Inhaling, bring the arms to the side and then begin to raise them up and arch back from the waist. Pull the hands up and push the arms back behind the ears. If comfortable, deepen the stretch by pressing the feet firmly into the ground, pushing the buttocks and thighs forward, keeping legs straight. Relax your neck.
- Exhaling, release the hands down and begin to bend forward. This time bring the hands behind the back, interlock the fingers and lift the hands up toward the ceiling when you inhale. When you exhale, make a gentle effort to drop the chest to close the gap with the thighs.
- Inhaling, bend the knees, place the palms on the floor right next to the feet. Now bring the right leg back into the lunge position, sliding the foot as far back as you comfortably can and bringing the knee to the floor.
- Exhaling, placing the palms on the floor, bring the other leg back. Lift your buttocks up to get into the Adhomukha Shvanasana (Downward Facing Dog). Try to push the thighs back, heels and forehead down, tailbone lifted and keep your shoulders back.
- Balasana (Child Pose):
Inhaling, lower your knees to the floor and this time push the buttocks all the way back close to the heels in the child pose (Balasana). Keep your forehead on the floor and start walking your hands out in front. - Bhujangasana (Cobra Pose):(Inhale) With the chin staying close to the floor, start sliding your body forward, without moving the hands, ending up in the Bhujangasana (cobra pose). Keep the shoulders rolled back, elbows bent and tucked in close to the body, and the navel on the floor. You are making a gentle effort to raise the chest higher.
- Adhomukha Shvanasana (Downward Facing Dog): (Exhale) Pressing down with the palms and curling the toes under, slowly lift your tailbone up and get into the ‘downward facing dog’ pose. In this pose, knees and elbows are straight, your effort is to press the heels close to the floor, lift the tailbone up and lower the forehead closer to the floor.
- Urdhvamukha Shvanasana (Upward Facing Dog): (Inhale) Bending the elbows slightly, bring the forehead between the palms close to the floor, and start sliding the body forward until you get into the ‘upward facing dog’ position. In the final position, the elbows are stretched straight, palms are directly under the shoulders, toes are pointing back, tops of the feet are flat on the floor, knees are slightly lifted from the floor and the chest is pushed forward and up.
- If, while sliding the body forward, it becomes uncomfortable to bend the elbows, you may keep them straight and then slide forward. Also, you may keep the knees on the floor, if needed.
- (Exhale) Once again, pushing with the palms, slide back into the ‘downward facing dog’ position. See 3 above.
- Plank Pose:(Inhale) Keeping the elbows straight, slide the body gently forward into the ‘plank’ position. In this position, the heels, buttocks and the shoulders are all in one straight line. Shoulders, positioned vertically above the hands, are lifted up and rolled back. if necessary, you may bring the knees to the floor and then try to lift the upper body up with the elbows straight.
- Chaturanga Dandasana (Four-limbed Pose):(Exhale) Slowly begin to bend the elbows, keeping them alongside the body, and bring the body down into the ‘chaturanga dandasana’ (four-limbed staff pose). Here the body is parallel to the floor with only the hands and the toes touching the floor. Alternately, you may like to keep the knees on the floor while bringing the chest parallel to the floor by bending the elbows.
- (Inhale) Lift yourself up back into the ‘plank’ pose. Repeat the above move one more time.
- (Exhale) Lower the knees, chest and chin down to the floor with the abdomen not making contact with the floor.
- (Inhale) Slowly, lower the abdomen down to the floor and lift the head, neck and chest up into the ‘bhujangasana’ (cobra pose).
- (Exhale) Gently lower the chin to the floor and start sliding the body back into the child pose, keeping the chin as close to the floor as possible.
- The above completes one round of the upper body strengthening routine. If comfortable, repeat this sequence one more time.
- Exhaling, curl your toes under, lift the buttocks up to get back to the downward facing dog. Try to push your heels and forehead down and keep your shoulders back.
- Inhaling, lift the head up, bring the right foot forward and place it between your hands, and bring the knee to the floor.
- Exhaling, bring the other leg forward and bend down from the waist with the knees stretched straight.
- Inhaling, stretch your arms to the side, bring them up and back overhead and bend back slowly from the waist.
- Exhaling, gently come back to an upright position and bring your arms down by your sides. Relax for a few breaths.

This is where we’ll integrate the sequence to develop upper body strength. The child pose is the beginning and the ending pose in this sequence. Make a note of where the hands are on the mat. Throughout the upper body routine, make sure that the hands stay ‘glued’ to the same spot on the mat.


Round 3
- Stand close to the top of the mat with the feet together or slightly apart but parallel to each other. As you exhale, put your hands in the prayer position in front of your chest.
- Inhaling, stretch your arms out in front, raise them up and arch back from the waist, pushing the hips out, legs straight. Relax your neck.
- Exhaling, fold forward, keeping the arms alongside the ears initially. In the final position, drop the hands to get close to the toes. Try to keep the knees straight, bending slightly if necessary.
- Inhaling, bring the left leg back into the lunge position, sliding the foot as far back as comfortable. This time we’ll keep the back leg very straight. Try to push the heel back and lift the left thigh upward to keep the back leg straight and strong. Try to keep the buttocks down and chest up.
- Exhaling, bring the other leg back and get into the plank position. Roll the shoulders forward so the shoulders are vertically above the palms. In this position, the heels, buttocks, shoulders and the neck are in a straight line. Try to keep the heels pushed back.
- Exhaling, lower your knees, chest and chin to the floor, keeping your buttocks lifted.
- Inhaling, lower your abdomen to the floor and slowly begin to lift your head, neck and chest up. Keep the toes pointing backward with the top of the feet on the ground. To get into the upward facing dog, we’ll try to press down with the top of the feet and then slowly lift the knees off the floor, if comfortable. While lifting the knees up, we want to keep the thighs pressing downward. Try to keep the shoulders vertically above the hands. Stay in the pose for a few moments.
- Exhaling, curl your toes under, lift the buttocks up to get back to the downward facing dog. Try to push your heels and forehead down and keep your shoulders back.
- Here again, we’ll integrate a sequence to help strengthen the upper body. For these moves, you’ll need to place a pair of blocks under your hands while you are in the down-dog position.
- Lifting the right foot up, bring the right knee on the outside of the right elbow and pause there briefly. Make sure the foot does not touch the floor until you get back to the down-dog position.
- Slowly, bring the foot back to get back to the down-dog position. Now, bring the right knee to the outside of the left elbow, making sure the foot does not touch the floor. Pause briefly and then get back to the down-dog position.
- The next move could be a little challenging for some of you – do the best you can. Lift the right foot off the floor and try to bring it between the palms making sure the foot does not touch the floor. Pause there briefly and get back to the down-dog position.
- Now, repeat the above moves with the left knee and the left foot, finally getting back to down-dog.
- Inhaling, lift the head up, bring the left foot forward and place it between your hands. Keep the right leg straight behind you. Try to push the heel back and lift the right thigh upward to keep the back leg straight and strong.
- Exhaling, bring the other leg forward and bend down from the waist with the knees stretched straight.
- Inhaling, stretch your arms forward, up and back overhead and bend back slowly from the waist.
- Exhaling, gently come back to an upright position and bring your arms down by your sides. Relax for a few breaths.


Down-dog foot lifted between palms
Lolasana (pendant pose)

- Sit in a comfortable, cross-legged porture (sukhāsana), with the ankles crossed. You may attempt the pose with or without the help of a pair of blocks. If you have never tried the pose before, it will be helpful to use the blocks. Place the blocks on each side of the body, next to the hips.
- Place the palms on the blocks, not trying to grip the block but just pressing down with the flat palms. While pressing down with the palms, lift the buttocks off the floor.
- Some of you might find the next move a little challenging. Make an effort to slide the buttocks backwards and pressing firmly with the palms, try to lift the feet also off the floor. If you are not able to lift the feet off, just making the effort of pressing firmly with the palms will help gradually build the upper body strength needed to finally lift the body off the floor.
- Once you become comfortable with this pose, you may attempt the next variation. For this variation, begin by sitting down with the legs stretched out in front.
- Now, pressing firmly with the palms, lift the buttocks off the floor. When you feel stable in this position, try to slide the buttocks backwards and then try to lift the legs off the floor as well. Again, if the legs don’t lift, just continue to maintain firm pressure with the palms to develop good upper body strength.


Lolasana (pendant pose) with the help of a chair

Lolasana chair – legs straight
- As a beginner, it is a good idea to practice this pose with the help of a chair with arms. The chair provides even more room (compared to the blocks) between the buttocks and the seat of the chair.
- Sit down with the buttocks resting on the front part of the chair. Pressing the palms firmly against the arms of the chair, lift the buttocks off the chair.
- Keeping the knees bent, try to lift the legs off the floor. The effort is to bring the knees close to the chest. Do the best you can by lifting the knees as high as you are comfortable with.
- Once you become comfortable with this movement and are able to bring the knees close to the chest, you may attempt the next variation. Just like we did on the floor, you can lift the buttocks up first. Then, keeping the legs straight, try to bring the legs to a horizontal position, so the body is in the shape of the letter “L”. With practice, over time, you may be able to hold this position for longer periods of time.

Lolasana chair – knees to chest
Purvottanasana (Table Top position)

- Sit down with your legs stretched out in front. Keep the legs straight and the feet together.
- Position the palms on the floor right next to the hips. While doing the tabletop movements, the feet and the hands will continue to remain at the same spot – they will not shift their position.
- Pressing down with the palms, while inhaling lift the buttocks up as high as they can go comfortably. Rolling the shoulders back, try to lift the chest up as well. Pause briefly in the final table top position.
- While exhaling, slowly bring the buttocks downwards; however, slide them back between the palms to the original position before resting them on the ground. Pause briefly.
- Repeat these moves 4-5 times.
- When you are done with the routine, sit in Vajrasana or Sukhasana (comfortable cross-legged) and relax for a few moments.

Kakasana (crow pose)

- Sit up on the toes as we get ready for the kakasana (crow pose).
- We’ll start wit a few baby steps. Place the palms flat on the ground, about shoulder width apart. Come up on the toes and position the upper arms, just above the elbows, against the inside of the knees. Press the elbows against the knees from inside out while the knees press against the elbows.
- Begin to shift the body weight forward until the feet may lift off the floor slightly. Then bring the feet down. Repeat these moves a couple of times, each time lifting the feet off the ground very briefly and bring them down.
- Now, we’ll do a similar “baby move” lifting one foot off the floor, one at a time. Start by lifting the right foot up, keeping the other down and staying in the position for a breath or two. Then bring the foot down and repeat by lifting the left foot up. Repeat these moves one more time.
- Now we get ready for the final move of the crow pose. As before, keep the elbows pressing against the knees and the knees against the elbows.
- Begin to shift the body weight forward until the feet begin to lift off the floor. In the beginning, when you lift both the feet up, you may need to bring one foot down just for a little support. You may need to repeat this move a few times until you develop good stability. Once you feel that you have stability, the balance and the strength of the arms, you can lift both the feet up and stay there for a few breaths. You may even try to lift the feet higher so the heels come closer to the buttocks. Depending on your capability, you can maintain the pose for whatever duration you’re comfortable with.
- Finally, come down slowly and relax in the Sukhasana (cross-legged pose) with the eyes closed.
Thanks for the wonderful, meaningful and a very useful upper body strengthening practice. I will benefit from this.
Thanks, Sekaran. Glad you enjoyed the article.