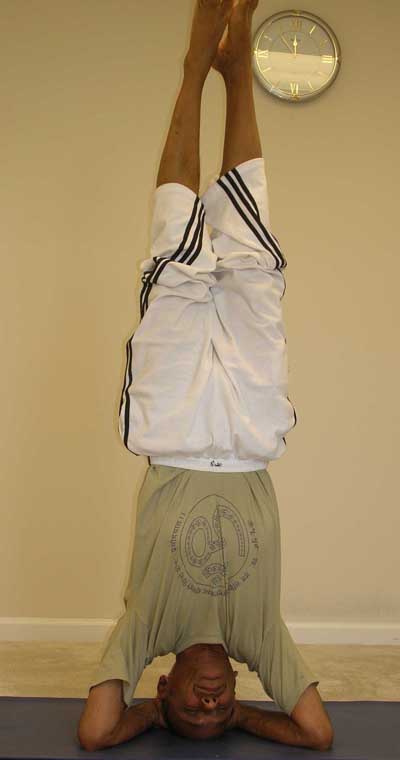
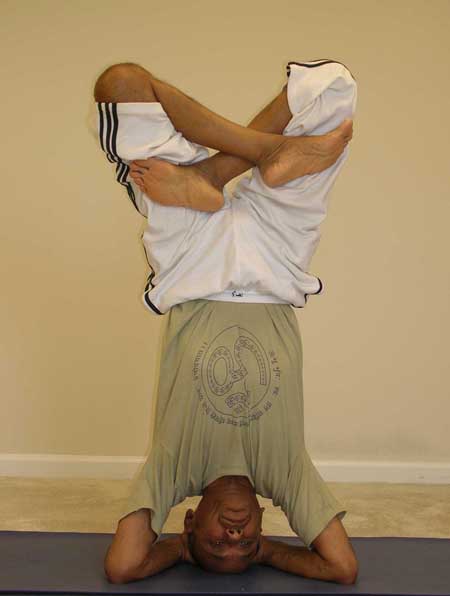
Shirshasana (headstand), along with Sarvangasana (shoulder stand), is one of the commonly practiced inverted poses. In today’s article, I am going to discuss the Shirshasana – (शीर्षासन) – [audio:http://www.integralyogastudio.com/sounds/shirshasana.mp3](headstand) along with some variations that are incorporated while in the asana. In many yoga texts, shirshasana has been described as "the king of asanas", perhaps due to the many benefits that it provides.
Preparation for the asana
- It is highly advisable that the shirshasana be learned under the guidance of an experienced teacher.
- Beginners should use a wall for support in the early stages. This will help them develop the necessary strength in the neck, shoulders and the head as well as help them develop balance and self-confidence so they can eventually practice it without any support.
- This asana should be gradually learned in stages, not trying to do too much, too soon!
- You can use a soft cushion like a folded blanket to practice upon so that the head and the neck feel comfortable on the floor in the final position.
I hope you will enjoy practicing with the video presentation
Step-by-step
- Place the mat against the wall. Start by sitting in the Vajrasana (diamond pose). Bending forward, place the forearms on the floor with the fingers interlocked. Position your hands about six inches away from the wall.
- The distance between the elbows should be approximately the length of a forearm. Place the crown of the head against the palms with the forehead lightly resting on the floor.
- Curling the toes under, lift the knees and buttocks off the floor and straighten the legs. Now, start walking your feet toward your forehead and try to bring the hips directly above the shoulders.
- Begin to lift your feet and using the core strength, raise the legs up keeping the knees bent. When the knees reach a vertical position, raise the feet up as well slowly so that the whole body is in a fully vertical position. This is the final shirshasana position.
- If you are a beginner, you may like to rest your feet against the wall. Avoid resting the buttocks against the wall. After a few days of practice, you may experiment by lifting the feet off the wall. Once you feel confident of balancing your body in the final position, you may attempt to practice this asana away from the wall.
- You can maintain the final position for as long as comfortable. With practice, you may be able to stay in the asana for upto four to five minutes.
- Begin by spreading the legs wide apart in a “V” shape.
- After a few breaths, we will begin to stretch the toes and the ankles. Start by curling the toes, almost like making a fist with the toes, then pull the toes up tight. Repeat this move a couple of more times.
- Now begin to rotate the ankle joints. Do a few rotations in one directions and then a few in the other direction.
- You may like to stay in the V shape for a few more breaths, if comfortable. Now bring the feet together again.
- Here, we’ll practice the Baddhakonasana (bound angle pose). Join the soles of the feet together. Then start lowering the feet down, bringing the heels as close to the buttocks as comfortable. Keep the knees away from each other.
- Stay in this position for a few breaths. Then slowly begin to raise the legs back to the vertical position.
- At this point we’ll try to bring the legs into the Padmasana (lotus) position. Start lowering one foot and bring it on top of the opposite thigh. Then lower the other foot and cross it over the other thigh in the full lotus position.
- You can stay in this position for a few breaths and then repeat the pose with the position of the feet and ankles interchanged. After a few more breaths, raise one leg at a time and bring the legs back to the vertical position.
- To come out of the pose, we use a technique which is just the reverse of what we used to get into the pose. Start by bending the knees, bringing the heels against the buttocks. Start lowering the knees toward your chest and then slowly lower the feet to the floor.
- When the knees and the feet are on the floor, then roll the buttocks back to rest in the child pose (balasana) for about 8-10 breaths.
Variations
While in the pose, we will now practice a few variations.
Contraindications
- Shirshasana should not be practiced by people who suffer from high blood pressure, migraine, heart disease, catarrh, chronic constipation, kidney problems, weak eye blood vessels or any other eye condition, spinal injury.
- Women who are pregnantor or are in their menstuation cycle should not practice shirshasana.
- If you have a medical condition that you are not sure of, consult your physician or the yoga teacher before practicing shirshasana.
Benefits
Shirshana provides the following benefits:
- Direct enriched oxygenated blood to the brain cells, rejuvenating them and making them more efficient.
- Prevent migraine and headache as it helps strengthen the blood vessels that cause headaches due to compression.
- Strengthen the glandular system and activate the pituitary glands.
- Work on the thyroid glands thus improving the metabolic function
- Increased blood circulation can help alleviate two common ailments, hemorrhoids and varicose veins, which are cuased by insufficient blood circulation in the legs and the anus area
- Recommended for the prevention of asthma, allergies, diabetes and menopausal imbalances.


Recent Comments