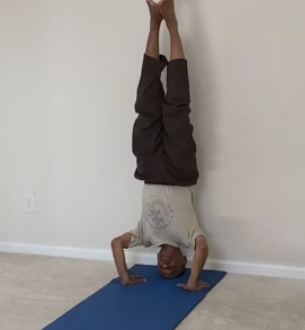
Tripod Headstand-1 (shirshasana)
In a recent post we discussed the classical version of the shirshasana (headstand). In this version, the fingers of the two hands are interlaced and the head is positioned against the two palms. The forehead is allowed to rest lightly on the floor.
In today’s post, we will practice another variation of the headstand called the tripod headstand. In this version, the head is fully on the ground whereas the palms are placed flat on the floor, about shoulder width apart. Effectively then, the two palms and the head are in the shape of a tripod which provides stability and balance for the pose. In this post, we’ll be practicing two variations of the tripod headstand or the Shirshasana.
I hope you will enjoy practicing with me using the video demonstration.
If you are a relative beginner, I recommend practicing the asana close to a wall. That way, you can use the wall support if you need to make any adjustments to the position of your hands, head or the neck while you are in the pose. Otherwise, you can either strain your neck or lose your balance and fall.
Variation 1
Step-by-step
- Place the mat against the wall. Start by sitting in the Vajrasana (diamond pose). Bending forward, place the head on the mat and position the palms on the floor about shoulder-width apart.
- Curl the toes under and lift the buttocks up. Position the knees so that they are resting on the outside of the elbows.
- Slowly lift the feet off the floor and gradually lift the knees from the elbows. Keeping the knees bent, continue to lift the knees up until they reach a vertical position. At this point begin to raise the legs up and bring them up to a vertical position. This is the final tripod headstand (shirshasana) position.
- If you are a beginner, you may want to rest your feet against the wall. With practice over a few days or weeks, you will develop enough strength and balance to be able to stay in the final position without the wall support.
- In the final position, try to keep the legs straight and the feet relaxed. You can maintain the final position for a duration that is comfortable for you. Over time you can build up your capacity to stay in the pose for up to two minutes or longer.
- While in the pose, if at any time you feel any strain or discomfort in your head, neck, shoulders or the arms you should gradually come out of the pose.
- To come out of the pose, very slowly lower one leg and then the other leg down.
- When the feet and the knees are on the floor, roll your buttocks back and rest in the Balasana (child pose) for about 8-10 breaths.
Variation 2
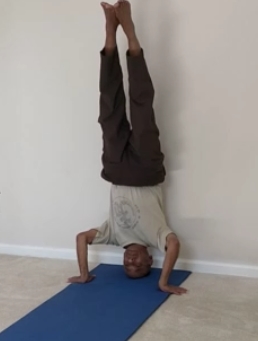
The main feature of this variation is that the legs remain completely straight while we get into the pose from the ground to the final vertical position.

Tripod Headstand-2 (shirshasana)
Step-by-step
- Place the mat against the wall. Start by sitting in the Vajrasana (diamond pose). Bending forward, place the head on the mat and position the palms on the edge of the mat, fingers facing outward.
- Curl the toes under and lifting the knees up. stretch the legs straight.
- Walk the feet slowly toward the forehead until the buttocks reach almost a vertical position.
- Now, keeping the legs very straight, begin to lift the feet up and gradually bring the legs up to a full vertical position. This is the final tripod headstand (shirshasana) position.
- If you are a beginner, you may want to rest your feet against the wall. With practice over a few days or weeks, you will develop enough strength and balance to be able to stay in the final position without the wall support.
- In the final position, try to keep the legs straight and the feet relaxed. You can maintain the final position for a duration that is comfortable for you. Over time you can build up your capacity to stay in the pose for up to two minutes or longer.
- While in the pose, if at any time you feel any strain or discomfort in your head, neck, shoulders or the arms you should gradually come out of the pose.
- To come out of the pose, very slowly lower one leg and then the other leg down.
- When the feet and the knees are on the floor, roll your buttocks back and rest in the Balasana (child pose) for about 8-10 breaths.
Thank you for making all of the poses so understandable and for modeling them so well. 🌸🙏🧘🏿♀️
Thanks, Camille, for your kind feedback.