In previous two posts, I discussed both the classical version as well as the “tripod” version of the Shirshasana (headstand pose). In today’s post, we will practice a few stretches that will help us prepare for the practice of headstand (shirshasana).
I hope you will enjoy practicing with the video demonstration.
Up/down dog from the forearm plank pose
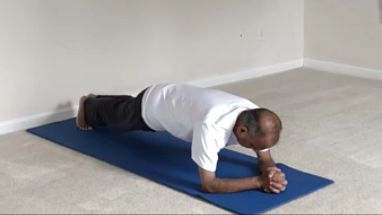
Shirshasana prep forearm plank
Lie down on your abdomen, face down on your mat. Relax for a few breaths.
Come up on the elbows and position the forearms and the palms flat on the ground. Optionally, you can interlock the fingers.
Curl the toes under and lift the knees and thighs up. Bring the body completely parallel to the floor in the plank position.
Stay in the plank position for about eight to ten breaths. This pose helps strengthen the core area as well as the arms and shoulders.
Come down slowly and rest for a few breaths.
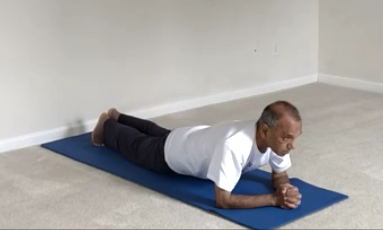
Shirshasana prep forearm updog
Now, come back up one more time into the forearm plank pose as before. This time we will add the movements of upward facing and downward facing dog from this plank.
To come into the upward facing dog, while inhaling, roll the shoulder all the way forward, lift the head and chest up and drop the thighs and buttocks down, making sure the knees or the thighs don’t touch the ground.
From here we’ll move into the downward facing dog. To get there, while exhaling, roll the shoulders all the way back, lift the buttocks up high toward the ceiling while dropping the head to the floor.
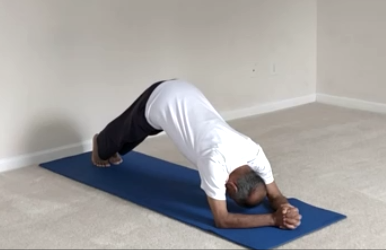
Shirshasana prep forearm downdog
Continue these movements for a few more breaths, keeping each move synchronized with the appropriate breath as indicated above.
When you complete the final exhalation, get into the child pose (balasana) and relax for a few moments.
Inverted “V” balancing pose
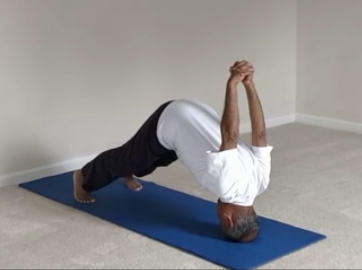
Shirshasana prep inverted V 1
From the child pose, lift the head up and come onto the hands and knees in the table top position.
Position the top of the head on the floor between the palms. Keep the palms about shoulder width apart, flat on the floor.
Slowly curl the toes under and lift the knees off the floor, making them straight. Try to pull the buttocks up toward the ceiling.
To help you initially with balance, spread the feet wide apart, almost the width of the mat.
Now, slowly lift the hands up, bring them behind the back, interlock the fingers and try to raise the hands up toward the ceiling with the elbows straight.
Try to stay in the final pose for about 8-10 breaths.
Slowly come down, bring the hands and the knees to the floor and rest in the child pose for a few breaths.
Now we’ll attempt to build more balance by keeping the feet as close to each other as possible, without losing balance.
Once again, position the top of the head on the floor between the palms. Keep the palms about shoulder width apart, flat on the floor.
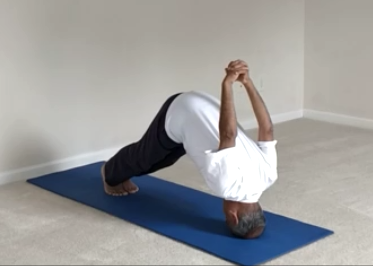
Shirshasana prep inverted V 2
Slowly curl the toes under and lift the knees off the floor, making them straight. Try to pull the buttocks up toward the ceiling.
Now, slowly lift the hands up, bring them behind the back, interlock the fingers and try to raise the hands up toward the ceiling with the elbows straight.
This time we will close the gap between the feet. It will take some practice and experimentation to know how close you can bring the feet together while maintaining balance. After some practice, you should be able to join the feet together while maintaining balance.
Try to maintain the final pose for about 8-10 breaths.
Slowly come down, bring the hands and the knees to the floor and rest in the child pose for a few breaths.
Inverted “V” Shirshasana prep pose
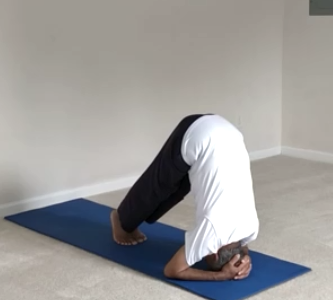
Shirshasana prep inverted V
From the child pose, lift the head up and position the elbows on the floor. Join the hands and interlock the fingers. Position the elbows about a forearm-width apart. Place the crown of the head between the two palms with the forehead resting lightly on the floor.
Now curl the toes under and lift the knees up. Try to stretch the legs straight.
Start walking the feet closer to the forehead, lifting the buttocks up toward the ceiling. Make the effort to bring the feet close enough so that the buttocks are almost vertically above the shoulders. Try to maintain this position for about 8-10 breaths.
This position should help you strengthen the arm, neck and shoulders as well as the core muscles and prepare you for the shirshasana pose.
Finally come out of the pose and relax in the child pose for a few breaths.
Final Shirshasana prep
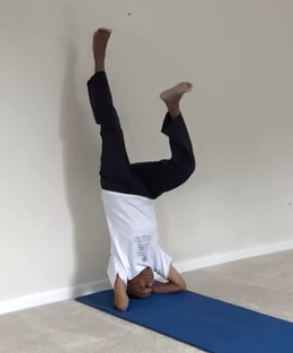
Shirshasana prep inverted V kick
Now we’ll practice how to get into the final shirshasana position against the wall.
Position your mat against the wall. Rest in the child pose for a few moments.
From the child pose, lift the head up and position the elbows on the floor, about six inches away from the wall. Join the hands and interlock the fingers. Position the elbows about a forearm-width apart. Place the crown of the head between the two palms with the forehead resting lightly on the floor.
Now curl the toes under and lift the knees up. Try to stretch the legs straight.
Start walking the feet closer to the forehead, lifting the buttocks up toward the ceiling. Make the effort to bring the feet close enough to the forehead so that the buttocks are almost vertically above the shoulders.
Now, begin by kicking one foot down and trying to lift both the legs up. You may need to do this kicking move a few times before you can bring one of the legs to rest against the wall. At that point lift the other leg as well and rest both the legs against the wall. Try to keep the legs straight, without resting the buttocks against the wall.
While in the final pose against the wall, make sure that your head, neck and the shoulders remain comfortable.
Stay in the final pose for about 8-10 breaths in the early stages of the practice. With practice over a period of time, you can build your practice to stay in the final pose for about 3 minutes.
To come out of the pose, slowly bring one leg down first and then the other leg down to the floor. Finally rest in the child pose for a few breaths.
After a few days of practice, you can start experimenting by releasing the feet away from the wall and see if you can maintain balance for even a short period of time.
When you begin to feel very comfortable in maintaining balance without support, you can attempt to do the shirshasana without the wall support.
Some people say that instead of doing Shirshasana – one can get same benefit by doing Sarvangasana. Your Comments please
Because of inversion, some of the benefits are the same. However, in shirshasana, we can supply more blood to the brain area due to direct pressure on the head. In Sarvangasana, there is more pressure on the neck and shoulders. Also, the thyroid and the parathyroid are massaged more effectively in Sarvanga. So, yes, there are some similarities but also some major differences.