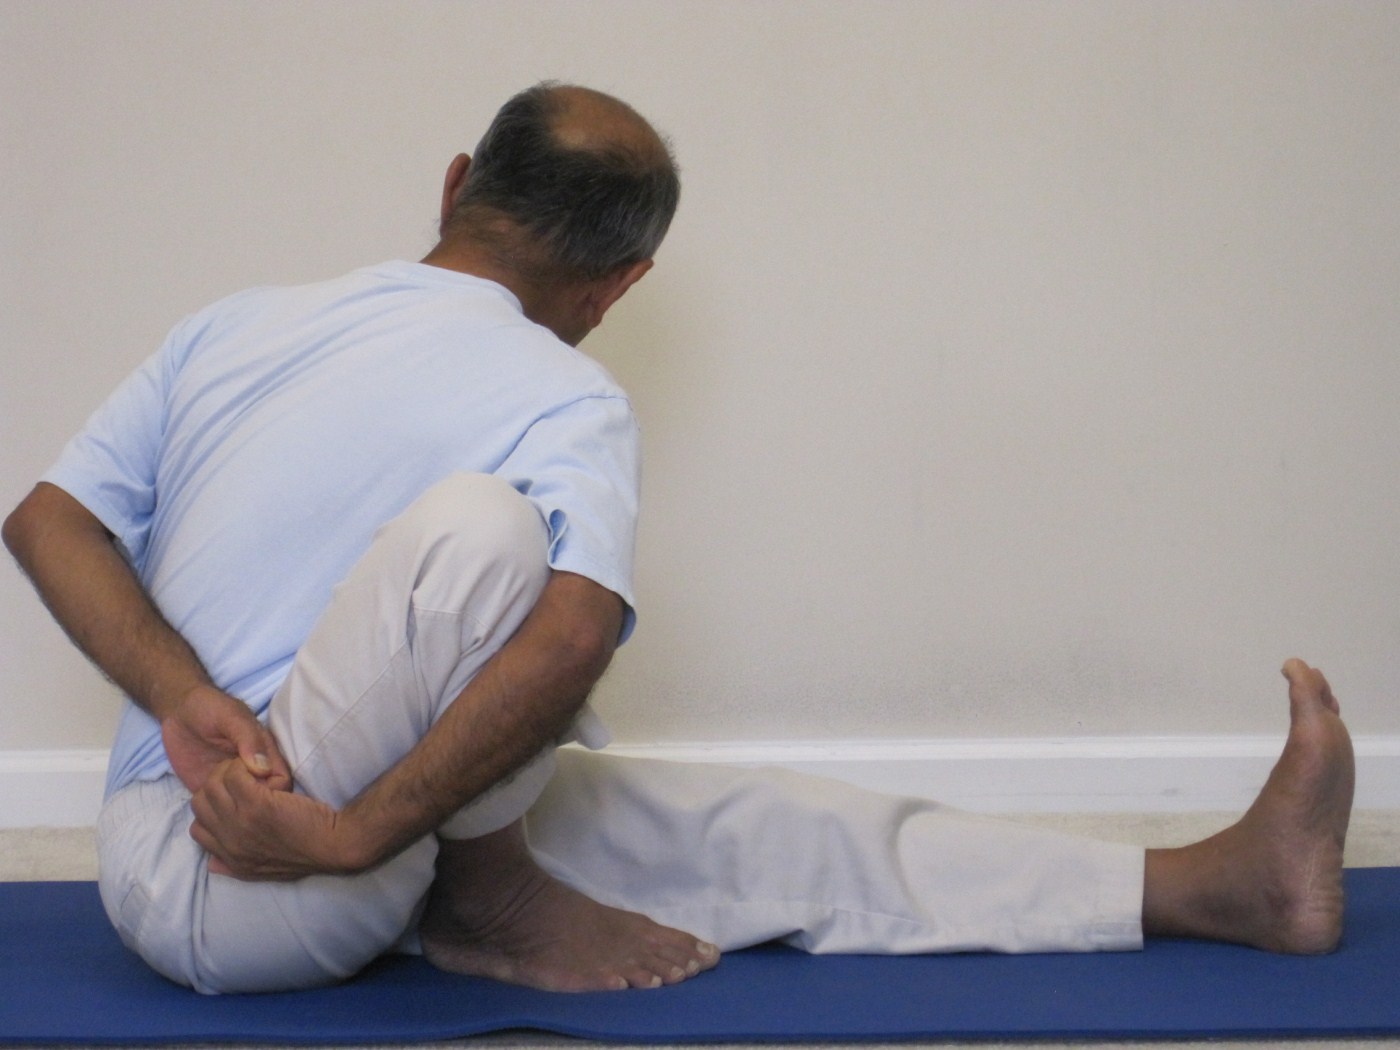
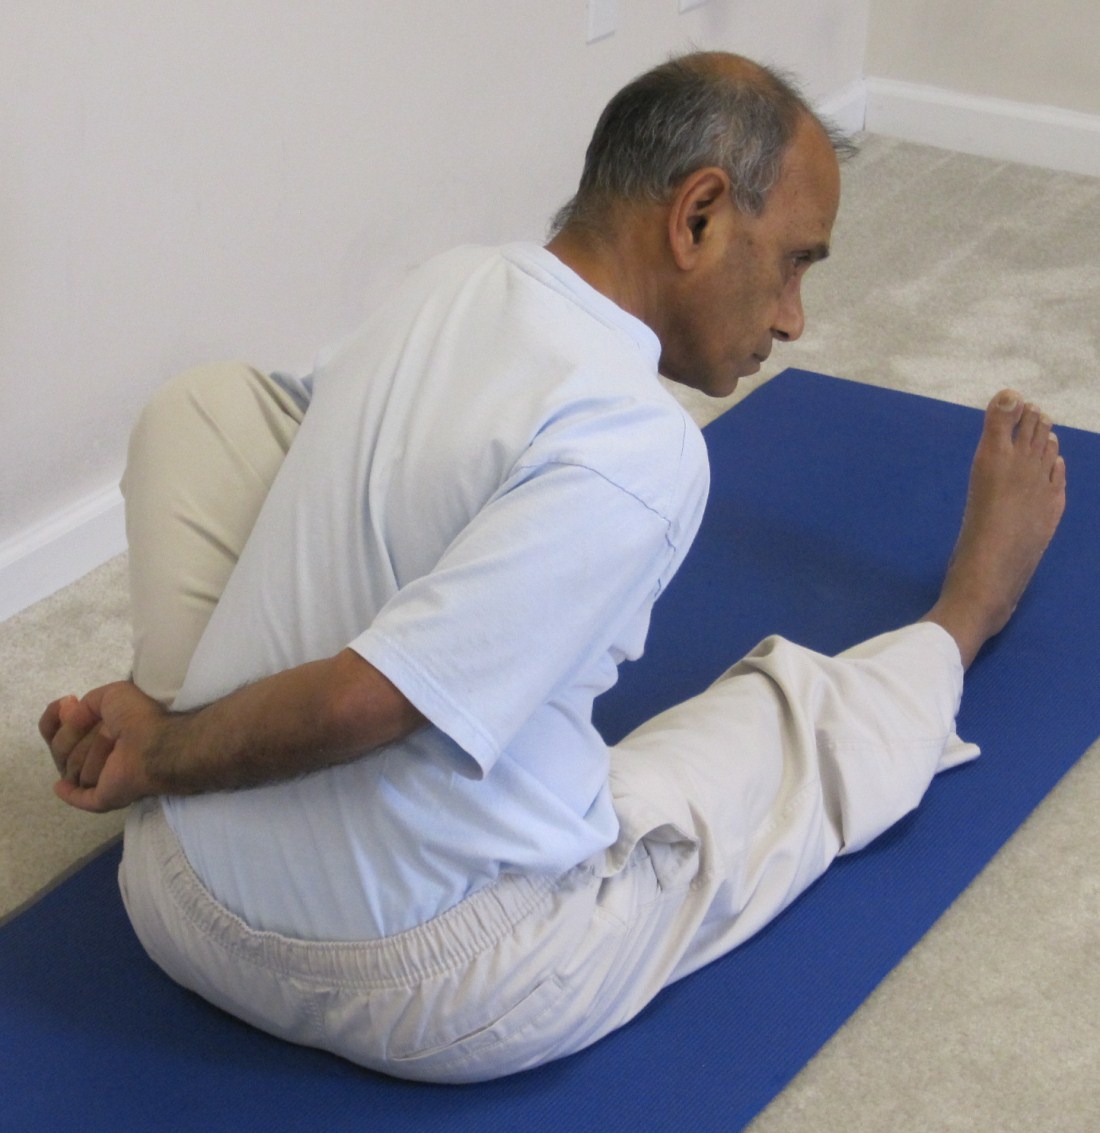
Marichyasana (मरीच्यासन) is named after the sage Marichi (not sure why!). The word Marichi (मरीचि) literally means a ray of light. As per the Hindu mythology, Marichi was the son of Brahma and chief of the Maruts (also called vayu or wind-gods). He’s one of the seven (sometimes 10 or 12) sages (rishis) or lords of creation (prajapatis), who intuitively “see” and determine the divine law of the universe (dharma).
This asana can be performed in addition to or as an alternative to the more commonly practiced Ardha Matsyendrasana (Spinal Twist). It offers many of the same benefits as the Spinal twist.
Hope you will enjoy practicing with me using the video.
Step by Step (Level 1)
This variation is recommended for a beginning student or one with limited flexibility in the thighs and the spine.
- Sit with the legs stretched out straight in front. Keep the spine upright.
- Bend the right knee and place the sole of the foot on the floor, with the heel as close to the right sitting bone as possible. Keep the left leg strong and straight, pressing the thigh firmly into the floor. Keep the spine straight (unrounded) throughout the pose.
- Bending slightly forward, turn the bent knee slightly to the outside and place the right upper arm on the inside of the right thigh with the palm facing outward. Bend the right elbow and bring the right hand toward the back.
- Wrap the left arm behind the back and try to hold the two hands together. If the hands don’t reach each other, you may use a strap with the two hands and try to bridge the gap between the two hands. Look over the right shoulder. Remember to keep your straight leg and bent-knee foot firmly grounded. Continue lengthening the spine with each inhalation, and twist a little more with each exhalation.
- Hold the pose for about 10 breaths. Then release and repeat on the other side.
- Sit with the legs stretched out straight in front. Keep the spine upright.
- Bend the left knee and place the sole of the foot on the floor, with the heel as close to the left sitting bone as possible. Keep the right leg strong and straight, pressing the thigh firmly into the floor. Keep the spine straight (unrounded) throughout the pose.
- Bending slightly forward, turn the bent knee slightly to the outside and place the left upper arm on the inside of the left thigh with the palm facing outward. Bend the left elbow and bring the left hand toward the back.
- Wrap the right arm behind the back and try to hold the two hands together. If the hands don’t reach each other, you may use a strap with the two hands and try to bridge the gap between the hands. Look over the left shoulder. Remember to keep your straight leg and bent-knee foot firmly grounded.
- Hold the pose for about 10 breaths. Then release and relax.
Step by Step (Level 2)
This variation is recommended for a more advanced student or one with greater flexibility in the thighs and the spine.
- Sit with the legs stretched out straight in front. Keep the spine upright.
- Bend the right knee and place the sole of the foot on the floor, with the heel as close to the right sitting bone as possible. Keep the left leg strong and straight, pressing the thigh firmly into the floor. Keep the spine straight (unrounded) throughout the pose.
- Bending slightly forward, place the left upper arm on the outside of the right thigh with the palm facing inward. Bend the left elbow and bring the left hand toward the back.
- Wrap the right arm behind the back and try to hold the two hands together. If the hands don’t reach each other, you may use a strap with the two hands and try to bridge the gap between the two hands. Look over the left shoulder. Remember to keep your straight leg and bent-knee foot firmly grounded. Continue lengthening the spine with each inhalation, and twist a little more with each exhalation.
- Hold the pose for about 10 breaths. Then release and repeat on the other side.
- Sit with the legs stretched out straight in front. Keep the spine upright.
- Bend the left knee and place the sole of the foot on the floor, with the heel as close to the left sitting bone as possible. Keep the right leg strong and straight, pressing the thigh firmly into the floor. Keep the spine straight (unrounded) throughout the pose.
- Bending slightly forward, place the right upper arm on the outside of the left thigh with the palm facing inward. Bend the right elbow and bring the right hand toward the back.
- Wrap the left arm behind the back and try to hold the two hands together. If the hands don’t reach each other, you may use a strap with the two hands and try to bridge the gap between the hands. Look over the right shoulder. Remember to keep your straight leg and bent-knee foot firmly grounded.
- Hold the pose for about 10 breaths. Then release and relax.
Benefits
- Massages abdominal organs including the liver, spleen, pancreas and kidneys
- Stretches the shoulders
- Stimulates the brain
- Relieves backache and hip pain
- Strengthens and stretches the spine
- Helps relieve constipation and flatulence
- Helps with sciatica
- Relieve menstual discomfort
Contraindications
- Serious back or spine injury: Perform this pose only under the supervision of an experienced teacher.
- Fluctuating (uncontrolled despite medication) High or low blood pressure
- Migraine or other headache
- Diarrhea
I would love to hear from you about your own experience with the practice of Marichyasana.


Pl guide Marichyasana activates Samana Vayu ?
I am not sure if and how this asana activates Samana Vayu. You may need to refer to some advanced books on pranayama.
Marichyasana A and C have only recently come to me and i love them. i never connected with them before when i was first learning yoga. a few months ago though, my body just started moving into this shape and afterwards i had to go investigate what it was. It was Marichyasana A. My body went through a big emotional release on that first spontaneous performing of the asana. That never happened again, but i do love to include at least Marichyasana A regularly. i find it helps release the stuck areas in my body a lot, and I love to use it to balance a handstanding focused practice. thank you for the detail on how the neck should be. That detail i didn’t find in my researching of the pose.
Kahrisa, it is so nice to see how your mind and body respond to this nice asana. Enjoy the practice!
Hello, great post, thank you.
by the way, I read recently, but not sure where, that the Marichyasana set of 4 poses are named after Sage Marichy as it was he who discovered them.
Indeed, it is named after sage Marichi. However, it is not necessarily true that he “discovered” it. I believe these asanas have evolved much later. Not sure how the name Marichi got associated with the pose.